In this Thrive Ultimatum review, you’ll learn about one of the most powerful plugins of the Thrive Suite membership.
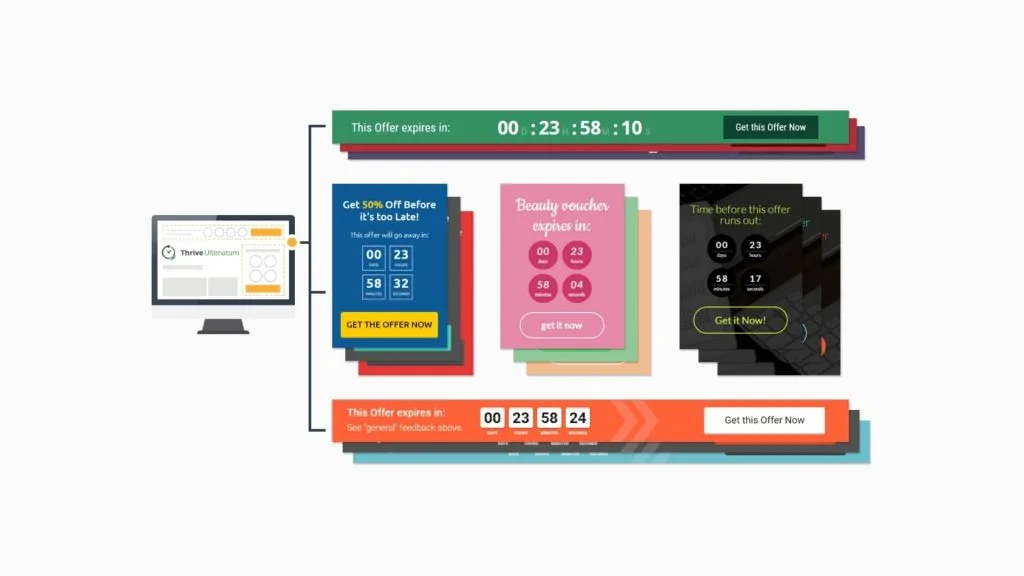
Thrive Ultimatum is a plugin for WordPress that will allow you to create different kinds of countdowns (even evergreen) to encourage your users to take an action (usually to purchase something)
Thrive Ultimatum Pricing
If you’ve already read some of our other reviews of Thrive Themes Products, like the review of Thrive Comments, or the review of Thrive Ovation, you probably already know that besides joining the Thrive Suite Membership, these plugins can be purchased independently.
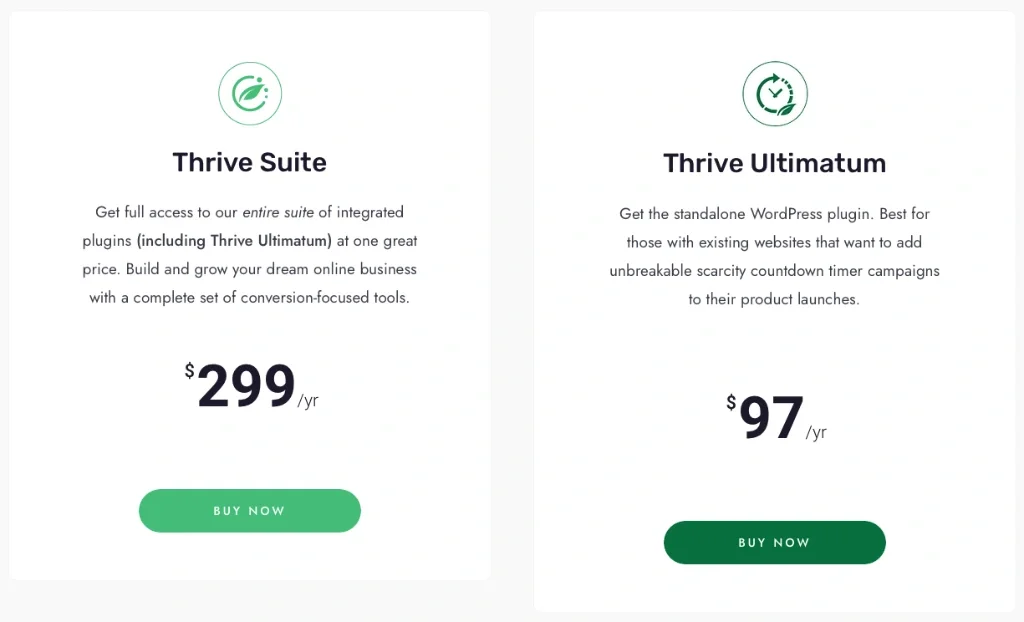
But in this case, the standalone purchase is more expensive than the other plugins, as it costs $97 per year for one site (remember this also includes Thrive Automator)
This makes sense as this is a more complex plugin, and it can directly increase your revenue with just a bunch of clicks.
But due to its nature and price, in this case, it’s difficult to recommend you to buy it separately or through the membership, as you could only need this for a couple of big launches, for instance, for a new course.
So besides making the purchase, I recommend you to read the full Thrive Suite review to understand how the other plugins work and decide which option is most worthwhile for you.
Read more about Thrive Ultimatum on the Thrive Themes website
Availability
As always, all the plugins from Thrive themes are available for:
- Any WordPress.org installation
- And any theme you use
You can’t use Thrive Ultimatum on emails though, something that its direct competitor (Deadline funnel) can do.
Thrive Ultimatum Tutorial
So, how does Thrive Ultimatum work?
Let’s see all the features this plugin can offer you.
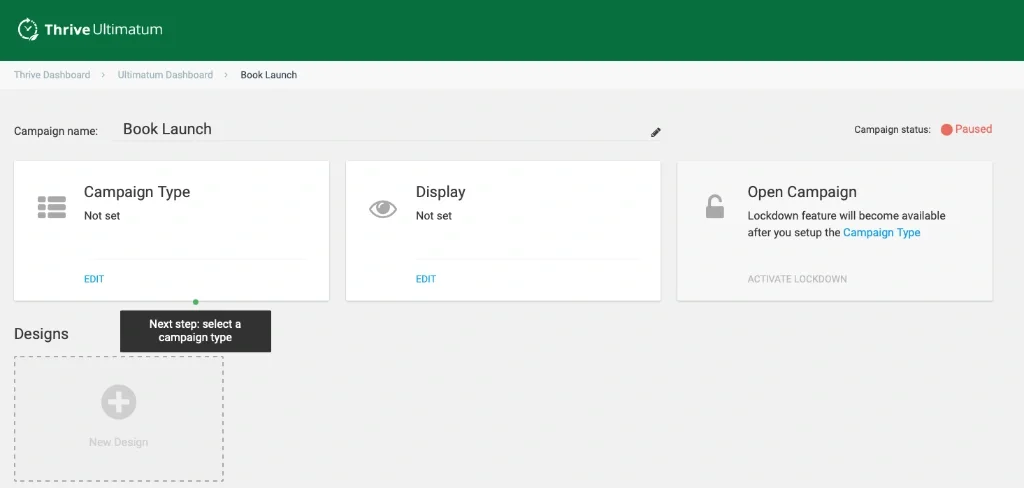
Once you’ve installed it from the Thrive Product Manager section, you’ll be able to access the dashboard from the WordPress Admin Panel.
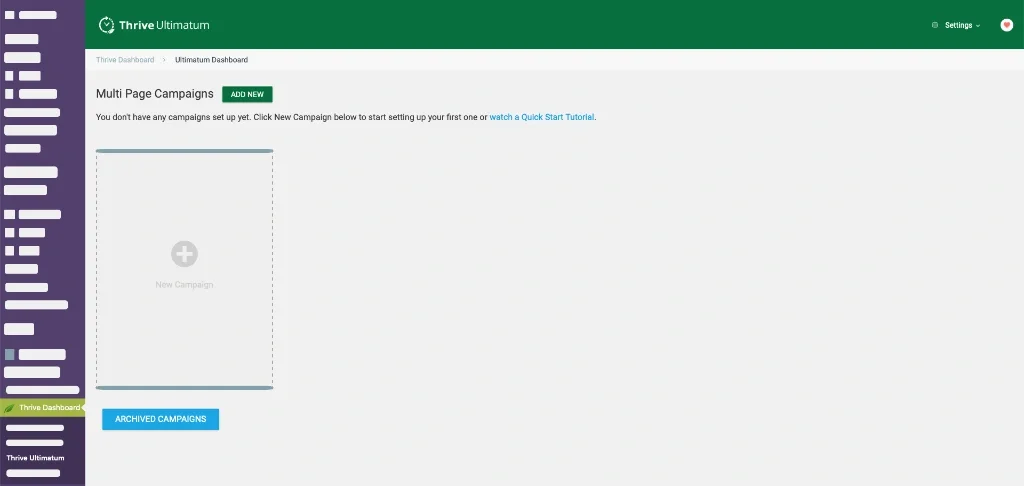
Besides tweaking some settings that only allow you to change the date and time format, and the time zone (something you’ll have to check to make your countdowns precise), there is only one thing you can do here.
Create a New Campaign.
A campaign will allow you to promote one of your products/services, and it will have a countdown associated.
As you can see in the image below, there are 3 templates to choose from, because “Built from scratch” is an empty campaign:
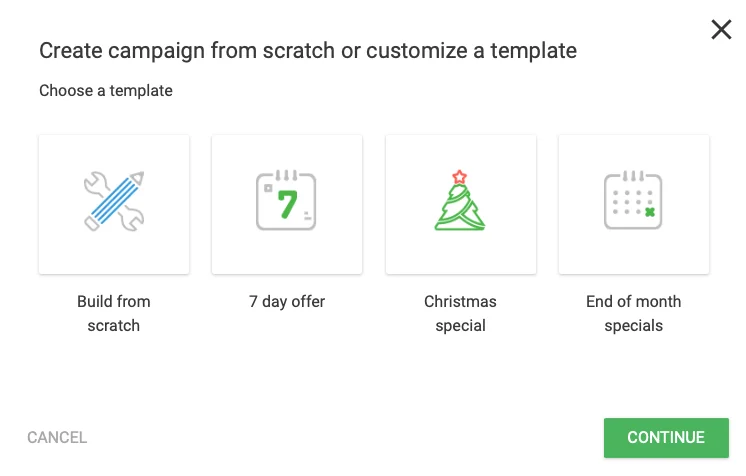
- “7-day offer” is a template that starts the countdown when a new reader visits your website. It ends after 7 days (for that specific user)
- This means the campaign is evergreen, as it’s not attached to any specific date, and it will be running forever for each new user that visits your website.
- Christmas Special is a template that starts and ends your campaign on specific dates. Dates of course don’t have to be Christmas, this is just an example.
- This means that the campaign is a Fixed date campaign as it will start and end at the same time for all your users.
- End of months specials is a template that will start a new campaign on your whole website on the 29th of each month, and it will last 2 days.
- This means that the campaign is a recurring campaign, which is significantly different from the evergreen one, as this one applies to all your readers equally.
These templates could save you some time once you fully understand how Thrive Ultimatum works, but if you are starting out, I recommend you just pick the empty template “Built from scratch”, as it’s really easy to configure a campaign from zero.
All you have to do is write a name (only used internally) to get to the main campaign interface.
This is what an empty campaign looks like on Thrive Ultimatum:
Step #1 - Picking the Campaign Type
The first step if you haven’t chosen a template, is to set the campaign type.
Even if you’ve picked a template, you’ll probably want to make some changes to it, like for instance, reducing the “7 days offer” to just 3 days.
You’ll do so from the Campaign Type Block:
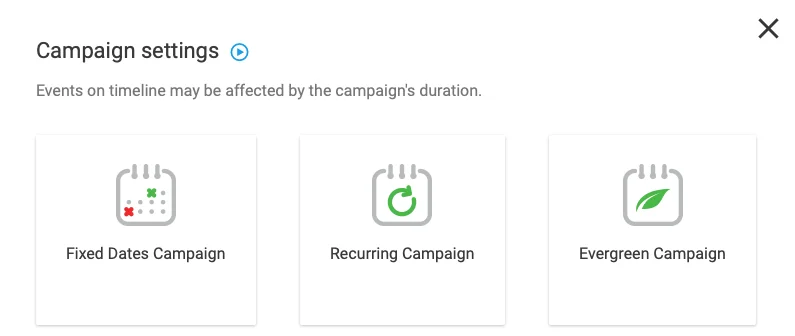
You already know this type of campaign, because they are the ones on which the templates are based.
Fixed Campaign Date (aka Christmas Special template)
This is the campaign you’ll have to use if you are planning a promotion in advance.
For instance, you could use this to offer a discount during the launch of a new course or book you’ll release on a specific date, or for promoting specific discounts during the classic Black Friday to Cyber Monday weekend, Veteran’s Day, Christmas…

As you can see, all you have to do is use the date picker to choose the start and the end date, and this includes hours, as this plugin is super precise.
Don’t forget to check that your timezone is correct!
Recurring Campaign (aka End of Month template)
This is a bit more complicated campaign to configure.
In this case, you’ll be creating repetitive offers on your site.
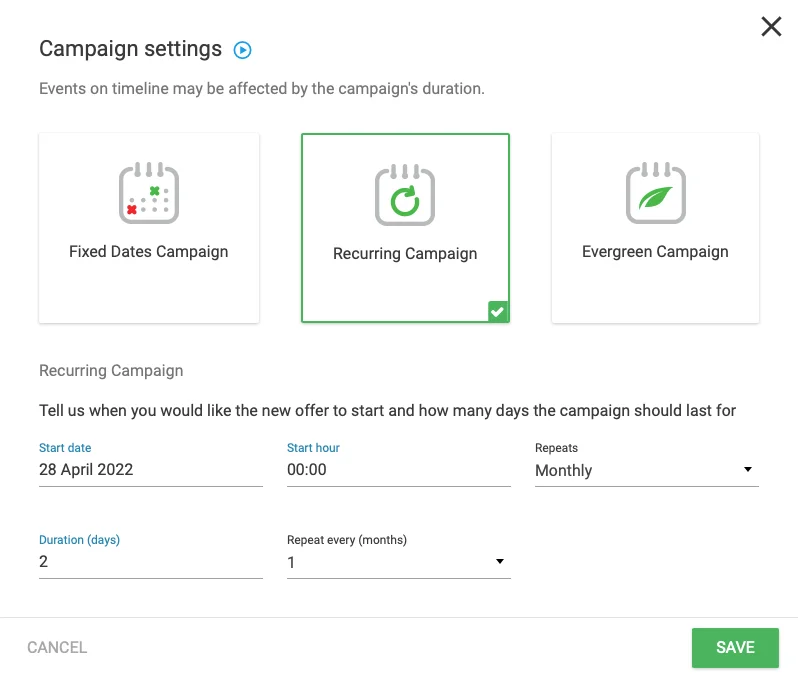
All you have to do is decide the start day, and how many days you want the offer to last.
Then it comes the difficult part, decide:
- If you want this to be repeated daily, weekly, monthly, or yearly.
- And the recurrence of that time lapse
How are you going to use this it’s going to depend on your business model and product/service.
For instance, if your business is highly date/hour-dependent, this type of campaign is super useful, as you could set offers for “low consumption” periods.
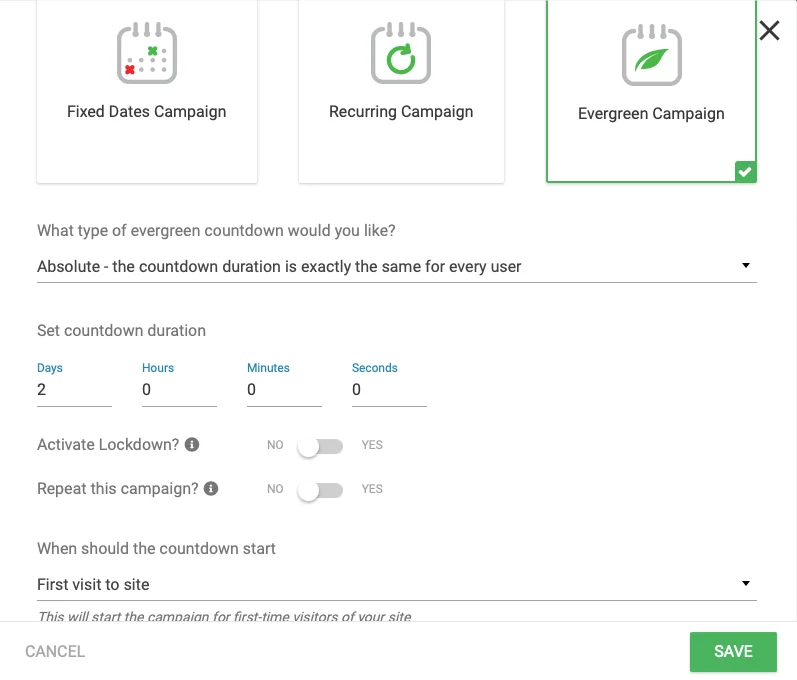
Thrive Ultimatum Evergreen Campaign (aka 7 day offer template)
This will probably be your favorite campaign, as the trigger is not a date, but a user doing a specific action, like visiting a page or subscribing to your newsletter using a specific form.
This is the most difficult campaign to configure, but also the most powerful.
There are several things to configure here:
- Trigger: what will start the offer for your visitor?
- First visit to the site: useful for general offers, as any page the user visits, will launch the offer.
- Visit to a specific page: useful for specific offers. For instance, If someone visits my Obsidian Review, I could offer him an Obsidian Book with a discount.
- Lead generation form is submitted (You’ll need Thrive Leads for this to work) This is useful if you have different signup forms on your site, as you’ll be able not only to target audiences with specific interests, but also warm leads, as they are already taking action.
- You can even activate offers when a webhook is received from a third-party platform! (an email marketing platform for example)
That’s the easiest setting to configure, but you’ll also have to decide:
- How long do you want the campaign to last (i.e., the time the offer will be available after the action), here you can even choose hours or minutes, not only days.
- The type of evergreen countdown (Absolute vs minimum duration): this is a very specific detail of the campaign that usually doesn’t affect conversions but it could. To make it clear:
- Absolute: the countdown will last for everyone as much as you decide (e.g. 5 hours after subscription)
- Minimum: at one specific time, after the time duration specified has passed.
Imagine that you offer a 5-hours window to buy one of your products with a discount to your new subscribers.
If anyone subscribes to your blog on Sunday at 11 pm, maybe he is going to sleep in just 1 hour, so your 5 hours are actually only 1 for him.
With the minimum option, you can set for instance that all your offers expire at 5 pm, so the previous user will have more room for maneuver.
Note that by doing that, everyone will have the same minimum time to buy, but a different maximum time.
You’ll have to test what’s best for your conversions.
Besides that, in the evergreen campaign is it also possible to decide:
- If you want to repeat the offer after X days (as the last opportunity to attempt to convert)
- If you want to activate a Lockdown (more on this later): so the offer only works for a specific subscriber.
Step #2 - Set Display Rules
The first step can take you a while to configure if you want to set up an evergreen campaign, but it will take you 2 mins and a couple of clicks if you use a fixed or recurring campaign.
After that, you’ll need to tell the plugin where you want the countdowns to appear.
This is very easy to do, as all the Thrive Plugins use the same conditional display settings window, where you can quickly specify:
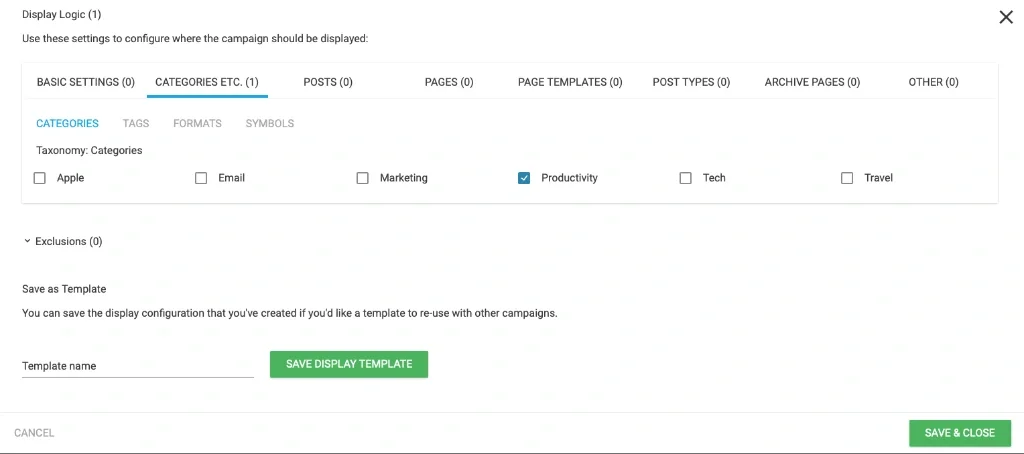
- Specific post or pages where you want the content to appear (in this case, the countdowns)
- Specific tags or categories
- Post types
- And many more
You can also add exclusions, and save your selection as a template for quickly loading the same parameters in future campaigns.
Step #3 - Activate Evergreen Lockdown (optional)
Here comes one of the most difficult steps you will be faced with when setting up Thrive Ultimatum.
Good news?
Is completely optional, and it’s not that difficult once you understand how it works!
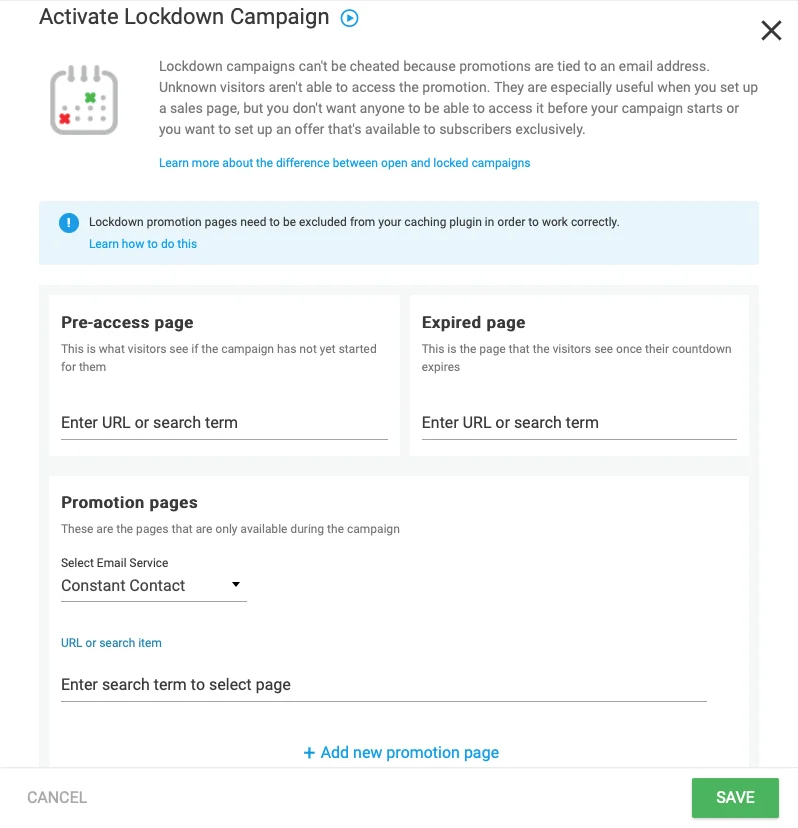
As you see in the settings window, you’ll need 3 kinds of pages for creating an Evergreen Lockdown Campaign:

- Pre-access page (coming-soon): If the campaign hasn’t started for a specific user, he will see this page.
- Expired page (Sorry, expired): If the campaign has ended for a specific user, he will see this page.
- Promotional page (Welcome!): if the campaign is running for a specific user, they’ll see this page (this is where your offer will be)
In order for the lockdown to work, you’ll need to use an evergreen campaign, and add as a trigger “visit to promotion page”.
By doing so, on the lockdown settings, after selecting your email marketing software, you’ll see the link that you have to use on your email marketing campaigns, it will look similar to this (it will vary depending on your email marketing software):
https://javi.link/product/?tu_id=1933&tu_em=%EMAIL%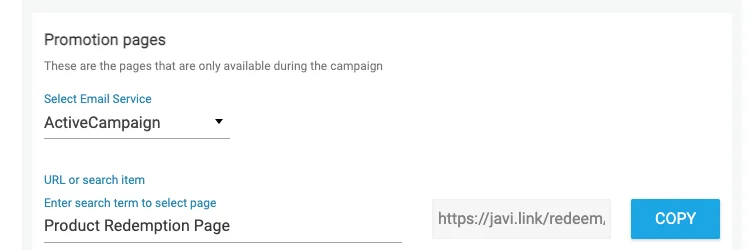
Remember, your promotional page will only be accessible through that link!
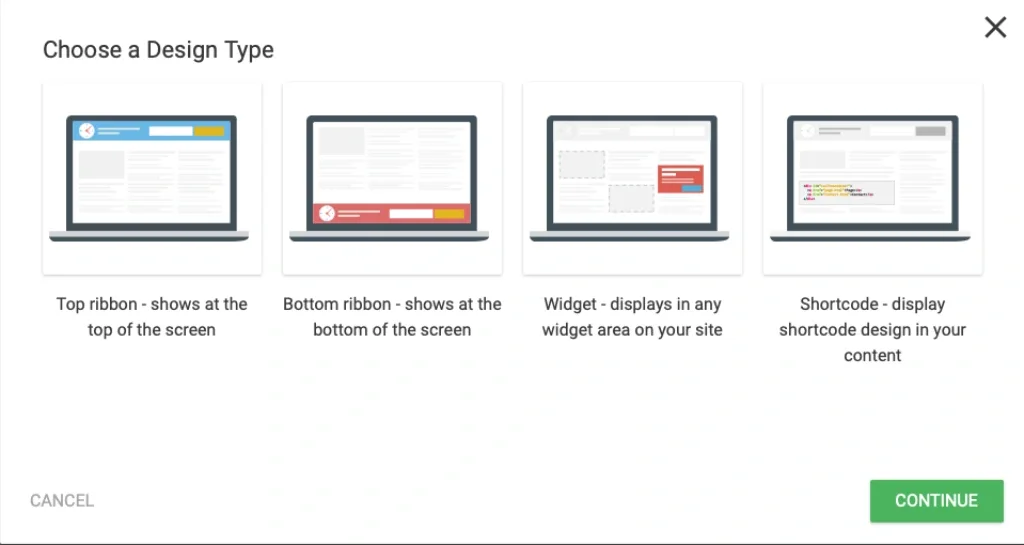
Step #4 - Design your countdown
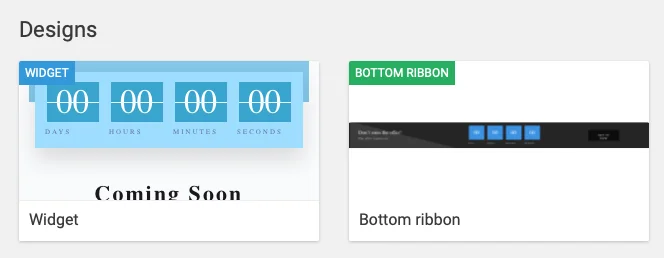
Now that the technical part is ready, it’s time to design our countdowns using the Design Tile.
There are 4 places where you can decide to show your countdowns:
- As a sticky top ribbon
- As a bottom ribbon
- As a Widget
- And as a shortcode you can add in any part of your content.
Whatever option you choose, click the edit button to start designing the countdown with an easy-to-use Thrive-Architect style drag and drop builder.
Don’t worry, you can start with a template that will streamline your work and make your countdowns look more professional.
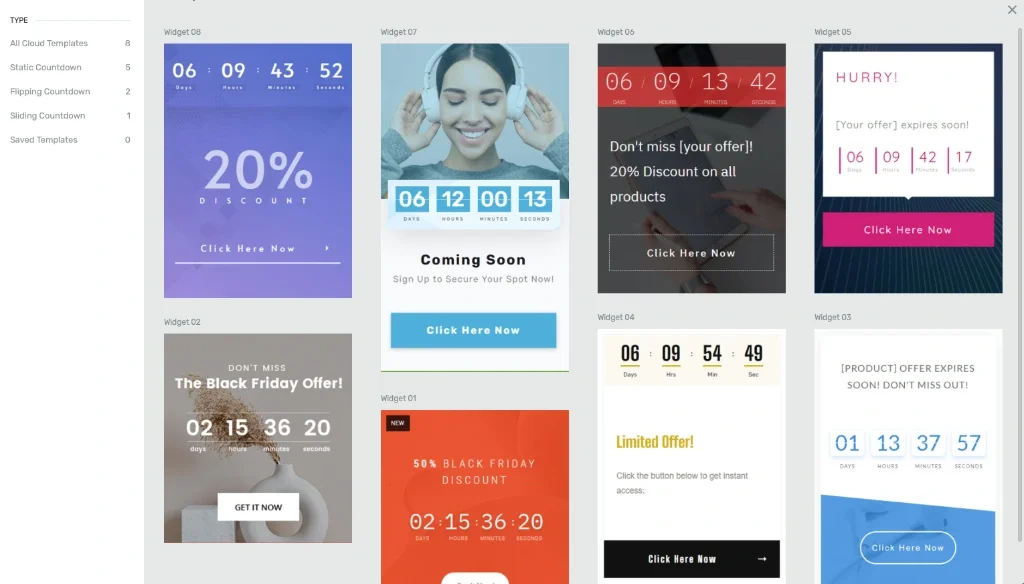
Examples of Templates for the Widget type design
There are two very important aspects to take into account when choosing your designs:
First, you can create more than 1 design type. You don’t have to choose between Widget and bottom ribbon, for instance, you can create both (you’ll see how not to show them at the same time later!)
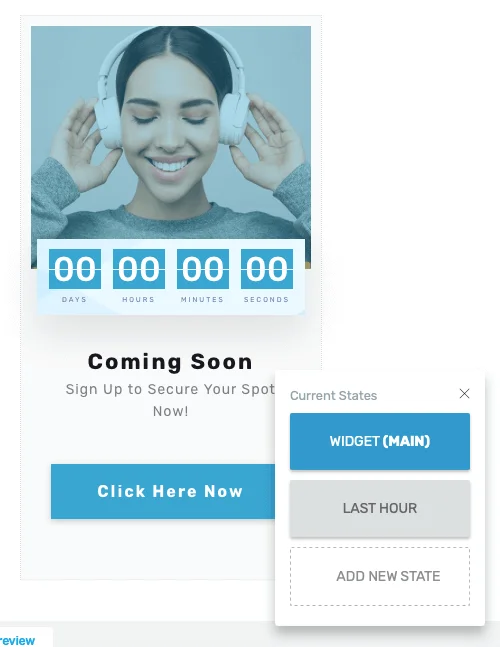
And second, when designing your countdowns, you can add more “states” by clicking on the green plus button.
For instance, you can create a state for when only 1 hour to purchase is left, and use a more aggressive copywriting.
As you can imagine, you need to specify somehow to Thrive Ultimatum, which kind of design and state you want to show, and when.
This is something you’ll do very easily with the timeline.
Step #5 - Configure the Timeline (“optional”)
This is an “optional” step because you could just skip it, but then the default timeline will be used, and it will show the default design during the whole countdown.
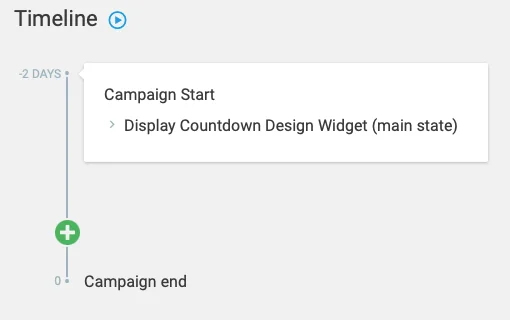
As a recap, at this point you can have:
- Different kinds of countdowns or “Places”: widget, inline, and top/bottom ribbon.
- Different states for each of them, i.e. different designs with different copywriting or images.
With the timeline, you’ll be able to pick what “places” and what “states” are shown along with the countdown.
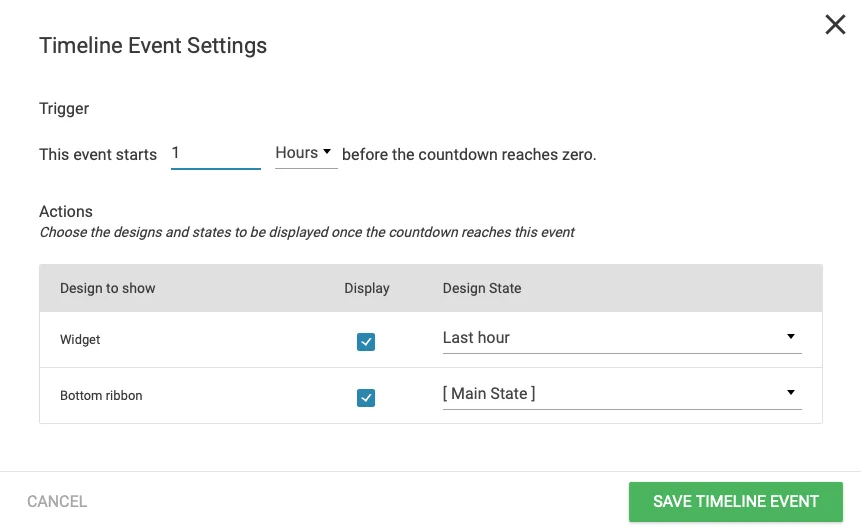
For instance, you can tell the plugin that when only 1 hour is left in the countdown, the widget shows a more aggressive state (that you must have previously created), plus a bottom ribbom (which is more eye-catching than a widget)
Step #6 - Set Goals (optional)
You are almost finished.
All you have to do now is setting a goal for this campaign.
This is necessary because your countdowns will have a purpose (usually to get a sell) and once that purpose is achieved, they should disappear.
You can easily configure that on the “conversion event” tile, as you can see in the image below.
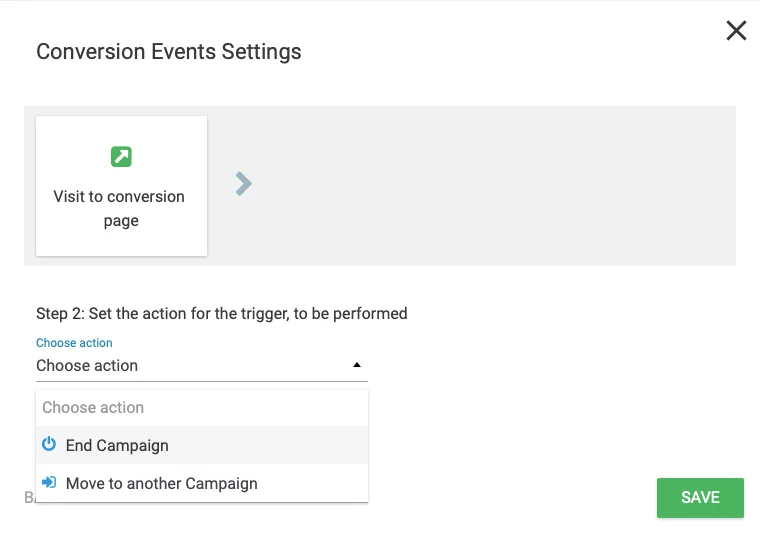
IMPORTANT!
Note that besides “ending the campaign”, there is also an action for starting another campaign.
This is super-useful for offering time-based up-sells, or exclusive products for your clients (like 1h consultation only if they purchase your book)
Step #7 - Run and test!
I’ve lost the count of how many times I set up a campaign, test it, and feel frustrated because it’s not working.
If your countdowns are not showing, usually it’s because of one of these problems:
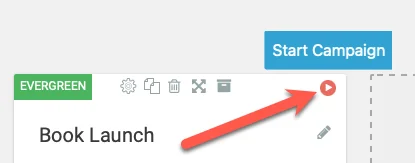
You haven’t started the campaign: by default, all the campaigns start as paused, you need to click the play button in order for them to start running.
You have a wrong conditional display or some campaigns are taking preference.
Because in Thrive Ultimatum you can create as many campaigns as you want, left ones always have preference over the ones on the right, so for the same conditional logic, the left campaign will show before the right one.
Two (or more) campaigns can’t be shown at the same time, so you’ll have to move them using the arrow to set your order preference.
Thrive Ultimatum honest opinion, is it worth it?
Definitely YES.
You can have nicer comments with Thrive Comments, or more leads thanks to Thrive Leads, but Thrive Ultimatum is 100% focused on closing the sale, and that’s good for your business.
And as far as it has automation capabilities, you can set it and forget it if you don’t want to be continuously working with it.
You don’t even need to have your own products to get the most out of it.
Many times I use Thrive Ultimatum to promote offers from affiliate products on their respective guides/reviews when they run time-limited offers.
And because the campaigns can be stopped and run with just a click, it’s very easy to show them again if in the future the developer runs another promotion.
This plugin looks expensive, but it’s not, if you compare it with for instance Deadline Funnel (its direct competitor), you’ll quickly see that, as DF costs $99 PER MONTH if you want unlimited campaigns! (while Thrive Ultimatum costs $97 per year!)
The biggest con of it is that it has a somewhat steep learning curve, but fortunately, only for the more advanced features, which are optional (like the lockdown)
If you want, you can start using Thrive Ultimatum in less than 20min, which is exactly what I recommend.
Get your Thrive Ultimatum copy!